How to Clarify Butter for Sauces: Step-by-Step Guide for Silky Results
Learn how to clarify butter for sauces with this easy guide. Achieve smooth, rich sauces like hollandaise and beurre blanc every time.
Written by FoodieManiac
With over 8 years of sauce-making experience, I've tested hundreds of techniques and products to bring you practical, reliable advice. Learn more about me →
Why Clarified Butter Matters for Sauces
Clarified butter is a fundamental ingredient in classical and modern sauce-making. Removing milk solids and water from butter yields a pure golden fat with a higher smoke point (up to 250°C/482°F versus about 175°C/350°F for regular butter). This allows you to build sauces that are silkier, less prone to burning, and visually pristine. Whether you’re making classic French hollandaise, a restaurant-style garlic butter sauce, or finishing a dish with a drizzle of golden butter, understanding how to clarify butter is essential for any serious sauce-maker.
What Is Clarified Butter?
Clarified butter is pure butterfat obtained by gently melting butter and separating out the water and milk proteins (solids). The process leaves you with a smooth, nutty fat perfect for emulsified sauces like hollandaise and béarnaise, or for sautéing and finishing sauces where clean flavor and texture are critical. Ghee, common in Indian cuisine, is a form of clarified butter that’s cooked longer to toast the milk solids, adding a deeper flavor.
Tools and Ingredients Needed
- Unsalted butter: Use high-quality, unsalted butter for best flavor. Start with at least 250g (2 sticks/1 cup) for about 180g (6.5 oz) clarified butter yield.
- Heavy-bottomed saucepan: Prevents burning and ensures even heat.
- Instant-read thermometer: For accurate temperature control (optional but recommended).
- Fine mesh strainer and/or cheesecloth: For straining milk solids.
- Ladle or spoon: For skimming foam.
- Heat-resistant bowl or glass measuring cup: To collect clarified butter.
Step-by-Step Guide: How to Clarify Butter
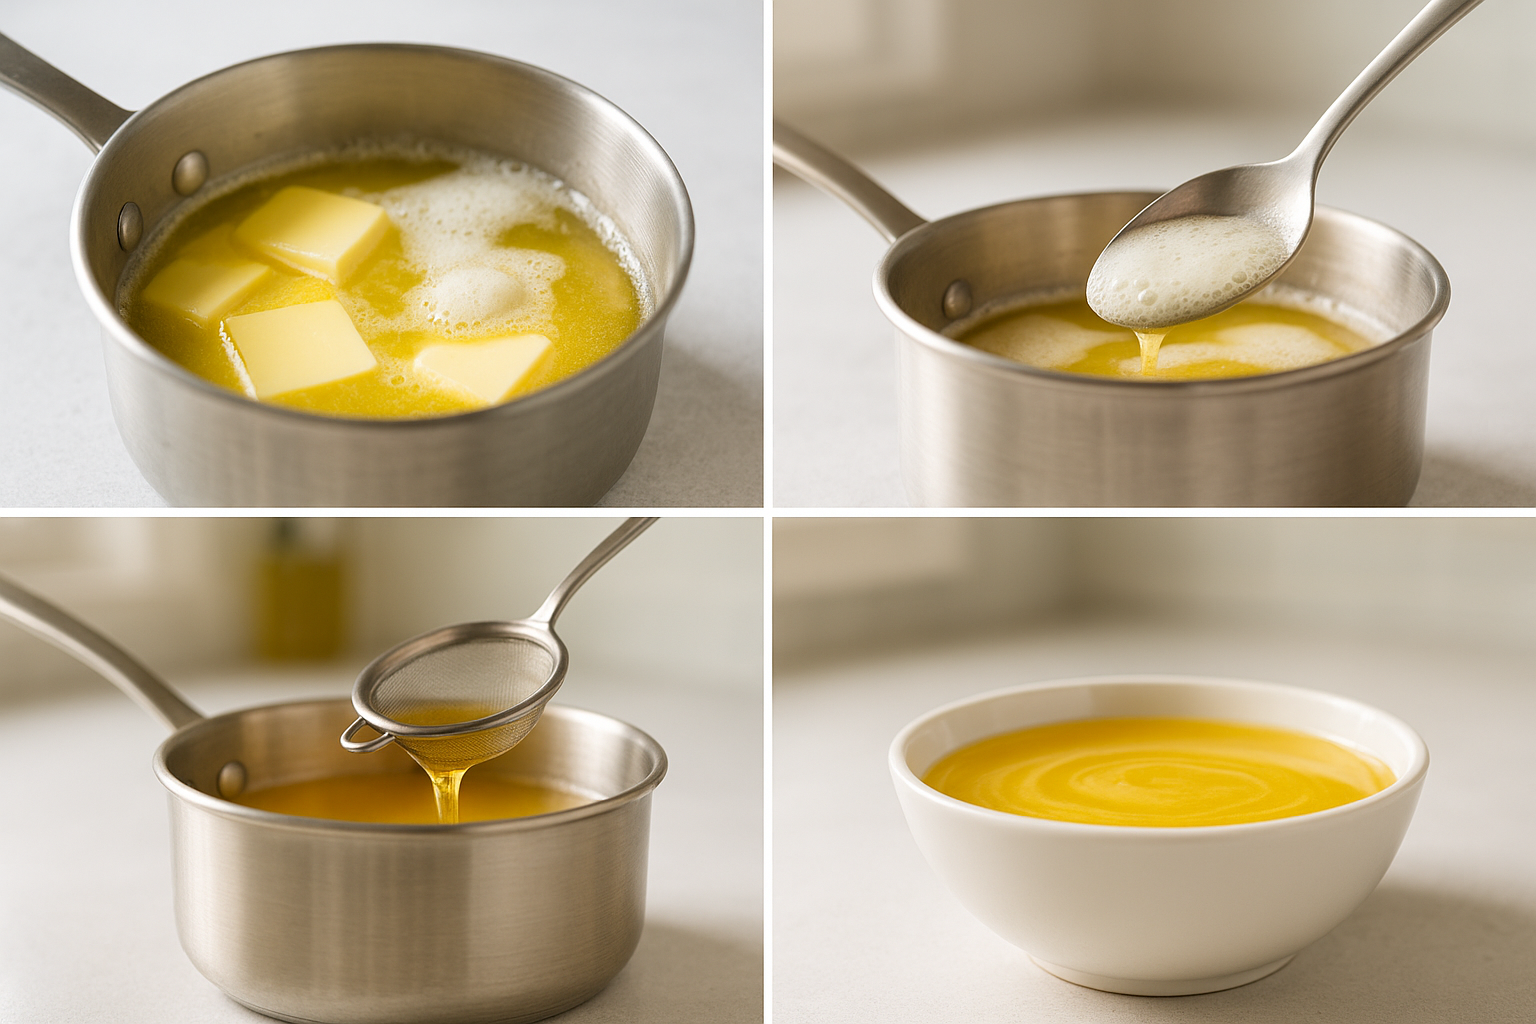
1. Cut and Melt Butter Gently
Cut butter into even 1-inch pieces for uniform melting. Place in a heavy-bottomed saucepan over low heat. Avoid stirring. Let the butter melt completely, which should take 4–7 minutes for 250g (2 sticks). Low heat prevents the milk solids from browning, which is crucial for classic clarified butter. If making ghee, you’ll want a gentle simmer later to toast the solids.
2. Separate the Layers as Butter Melts
As butter melts, you’ll see three layers form:
- Foam (top): White bubbles - these are denatured proteins and trapped moisture.
- Clarified butter (middle): Clear, golden liquid.
- Milk solids (bottom): White particles that sink.
Do not stir. Let the separation happen naturally so the layers remain distinct.
3. Skim the Foam Carefully
Once melted and gently bubbling (about 90–95°C / 195–203°F), use a spoon or ladle to skim the white foam from the surface. Removing this foam results in a cleaner butterfat. Skim periodically as more foam forms. Continue until bubbling slows and the foam layer thins, about 2–3 minutes.
4. Monitor Temperature and Clarity
Keeping the heat low is critical. If you have a thermometer, maintain butter below 100°C (212°F) for clarified butter. For ghee or if you want a slightly nutty flavor, allow the temperature to climb gently up to 120°C (248°F); the milk solids will turn light brown and sink. For most sauces, avoid browning the solids - clarified butter should remain golden without brown flecks.
5. Strain Out Milk Solids
Once no more foam rises and the butter is completely transparent, remove from heat. Let it settle for 1–2 minutes. Slowly pour or ladle the clear middle layer into a heatproof container, stopping before the bottom layer of milk solids. For maximum purity, pour through a fine mesh strainer lined with cheesecloth or a coffee filter.
6. Cool and Store Properly
Let clarified butter cool to room temperature. Store in an airtight glass jar in the fridge for up to a month, or freeze for up to 6 months. Properly clarified butter resists rancidity because the milk proteins that spoil quickly are removed. For safe storage tips and to prevent spoilage, see How to Store Creamy Sauces: Prevent Separation and Spoilage Safely.
Clarified Butter in Sauce-Making: Technical Benefits
- Emulsification: Without milk solids, clarified butter creates more stable emulsions in classic sauces like hollandaise, béarnaise, and beurre blanc. This prevents breaking and promotes a smooth, glossy finish.
- Higher Smoke Point: Clarified butter’s smoke point (about 250°C/482°F) is crucial for pan sauces and sautéing, as it won’t burn as quickly as regular butter. It’s ideal for recipes like Homemade Chimichurri Sauce for Grilled Meats, where high-heat finishing is used.
- Flavor Purity: Removing water and solids means pure butter flavor without risk of burnt bits or bitterness in the final sauce.
- Visual Appeal: Clarified butter gives sauces a translucent, golden sheen with no white specks or cloudiness.
Common Sauce Applications for Clarified Butter
- Hollandaise and Béarnaise: These emulsified egg sauces require clarified butter for a smooth, stable texture. For tips on making egg-based sauces without curdling, read How to Temper Eggs for Sauces: Prevent Curdling in Custards and Creamy Classics.
- Finishing Pan Sauces: Swirl clarified butter into reductions for a glossy, rich finish. See How to Make 5-Minute Pan Sauces for Chicken, Fish, and Veggies for inspiration.
- Traditional French Sauces: Classic beurre blanc, beurre monté, or sabayon all benefit from clarified butter.
- Garlic Butter and Compound Butters: Use clarified butter as a base for flavor infusions, such as in Restaurant-Style Garlic Butter Sauce Recipe.
- Drizzling and Dipping: Serve clarified butter warm with shellfish, or as a dip for grilled vegetables and meats.
Actionable Tips for Perfect Clarification
- Use Unsalted Butter Only: Salted butter produces cloudy clarified butter (salt binds with proteins and water).
- Don’t Rush the Melting: High heat emulsifies the layers, making separation impossible. Always melt on low.
- Skim Diligently: The more thoroughly you skim, the cleaner your butterfat; sauces will be silkier.
- Strain Twice for Maximum Clarity: After the first straining, let clarified butter settle, then strain again if you see any additional particles.
- Warm Before Use in Emulsions: For sauces like hollandaise, bring clarified butter to 50–60°C (122–140°F) before slowly whisking into egg yolks. Cold butter will seize the emulsion.
- Weigh for Precision: For recipes requiring exact ratios (like hollandaise: 100g butter to 2 yolks), weigh your clarified butter after straining.
Clarified Butter vs. Whole Butter in Sauce Recipes
Some sauces deliberately use whole butter to take advantage of the milk solids for flavor and body, like in certain pan sauces or for finishing a Homemade Creamy Parmesan Peppercorn Dressing. However, clarified butter is preferred where:
- Stability is needed for emulsions.
- High heat is used for sautéing or reducing.
- Visual clarity is important, such as in drizzled finishing sauces.
Clarified Butter for Flavor Infusions
Clarified butter is an excellent carrier for herbs and spices - free of water and proteins, it extracts flavors cleanly. Gently warm clarified butter with aromatics (garlic, rosemary, chili flakes) at 70–80°C (158–176°F) for 5–10 minutes, then strain. Use this aromatic butter to elevate dips like Creamy Feta Dill Dip or drizzle over sauces such as Authentic Lebanese Tarator Sauce. For advanced flavor layering, explore How to Infuse Sauces With Herbs and Spices: Techniques for Maximum Flavor.
How Much Clarified Butter Will I Get?
Butter is roughly 80% fat, 16–18% water, and 1–2% milk solids. After clarification:
- 250g (1 cup/2 sticks) unsalted butter yields about 180–190g (6.3–6.7 oz) clarified butter.
- 500g (2 cups/4 sticks) unsalted butter yields about 360–380g (12.7–13.4 oz) clarified butter.
Plan your sauce recipes accordingly, especially when scaling up for large batches or meal prep - see How to Can Sauces Safely at Home: Step-by-Step Guide for Beginners for tips on preserving larger quantities.
Frequently Asked Questions
Can I Clarify Butter in Advance?
Yes. Clarified butter keeps well in the fridge (up to 1 month sealed) or freezer (6 months), making it ideal for batch-prepping sauces like Homemade Creamy Buffalo Blue Cheese Dip or Homemade Spicy Pineapple BBQ Sauce.
Is Clarified Butter the Same as Ghee?
Similar, but not identical. Ghee is clarified butter cooked longer (to 120–130°C/248–266°F) until milk solids toast and the butter develops a nutty aroma - great for sauces needing extra depth, but not traditional French emulsions.
Can I Use Clarified Butter in Dressings?
Yes, but only in warm or blended dressings, as clarified butter solidifies below 35°C/95°F. For chilled sauces like Thermomix Creamy Roasted Garlic Caesar Dressing, use oils or whole butter for creaminess.
Related Recipes to Try with Clarified Butter
- Restaurant-Style Garlic Butter Sauce Recipe: The gold standard for steak, seafood, and pasta.
- Homemade Chimichurri Sauce for Grilled Meats: Drizzle clarified butter for a glossy finish on grilled meats.
- Homemade Creamy Parmesan Peppercorn Dressing: Experiment with clarified butter for a silkier texture.
- Creamy Feta Dill Dip: Use clarified butter as a base for an herby, rich variation.
Expert Troubleshooting for Clarified Butter
- Cloudy Butter: Likely caused by stirring, high heat, or incomplete straining. Remelt gently and strain again through fine cheesecloth.
- Foamy or White Specks: Not enough skimming or straining. Let settle, then pour off the clear butter, leaving solids behind.
- Burnt Flavor: Overheated butter (above 120°C/248°F) causes solids to burn. Always use low heat and monitor closely.
- Separation in Fridge: Normal - clarified butter solidifies but remelts uniformly. Warm gently before use in sauces.
Conclusion: Elevate Any Sauce with Clarified Butter
Mastering clarified butter is a foundational technique for any sauce enthusiast. It delivers silky textures, pure flavor, and professional results across a spectrum of sauce styles - from emulsified classics to bold modern infusions. For more sauce-making techniques, explore How to Strain Sauces Like a Pro, and for keeping your sauces fresh and safe, visit How to Store Sauces in the Fridge: Safety, Shelf Life, and Best Containers. With clarified butter ready in your kitchen, every sauce you make can be a showcase of silky, restaurant-quality perfection.
